
WordPress is popular because of its reliability and ease of use. More than 35% of the total websites are based on the CMS. With that said, sometimes problems occur in the tool which results in breaking the focus of the publisher and a lot of annoyance.
One such occasional issue is the WordPress image upload HTTP error. In this article, we will see what the error is and how you can fix it.
What is an HTTP error when uploading images in WordPress?
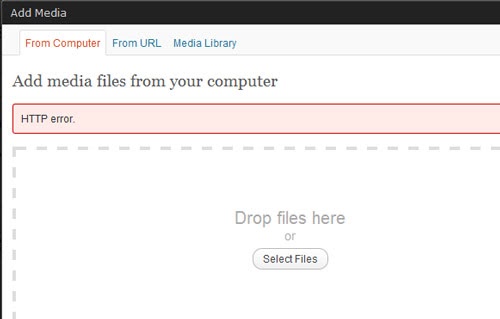
When you try to upload a media file on WordPress (Image or Video), WordPress sometimes refuses to upload it. Instead, it shows a generic message that spells ‘HTTP error’. That is all the information you get and there isn’t any info on how you can fix it.
The thing is, sometimes WordPress does not even know what caused the issue.
It could either be a client-side error, meaning that there is something wrong with the file or your network connection.
On the other hand, the image may be refusing to upload because of a server-side error, meaning that your web hosting hasn’t been configured in the right way. This includes network error in the hosting, a problem with the server resources, or an issue with a plugin(s).
How do I fix HTTP image upload error in WordPress?
You can try these things to fix the HTTP Image upload error.
1. Refresh the Page
Your browser may have lost its connection with the WordPress server because of a temporary network issue or an internal system error in the WordPress host. This can be fixed by refreshing the web page.
Sometimes, when you refresh the page, WordPress takes you back to the login screen saying your session has expired. In most cases, even if you login with the correct credentials (username and password), the HTTP image error still persists.
However, it will be addressed once you refresh the page again.

2. Resize the File
Uploading the correct image size on your WordPress isn’t only to avoid HTTP error. The number and the size of images on your website heavily influence how fast it loads. Furthermore, the page load speed is one of the most important Google ranking factors
It is always a good idea to keep your image size around or less than 100 kb. This makes sure that the HD image encoding doesn’t slow your site down, and at the same time, you don’t lose much quality in your images.
You should also upload the recommended dimensions for different types of photos. Here is a table as a general guide:
| Image Type | Default (Recommended) Dimensions |
| Twitter Images | 1024px X 512px |
| Facebook Images | 1200px X 630px |
| Facebook Images | Better to keep it 400px X 300px |
Instead of using WordPress plugins, you should upload the right image size from the device itself. One of the best free tools for this purpose is Riot.
To optimize an image, go to File>Open, and select the file you want to resize. You can also drag the photo into the tool. Then, select the dimensions and the quality of the final image, and you can export the file.
You can also change PNG images to JPEG and vice versa to see if it fixes the problem. You can easily do it with Riot as well. Just click on the preferred file type.

3. Rename the Image File
Special characters in the name or the same file name for multiple images can confuse WordPress.
When you upload files with the same name, WordPress itself assigns the second (and upcoming) images with a hyphen and a number.
For example, if the image name is Imagename.jpg, and upload another photo with the same name, WordPress will rename it to Imagename.jpg-1.
Sometimes, WordPress may not be able to rename the file because of a system issue, and you will have to do it manually on your computer before uploading.
Also, make sure that your image name only consists of letters, numbers, or hyphens. WordPress may not be able to process special characters like mathematical symbols, or characters from other languages.
4. Disable Plugins and Theme
On your WordPress Dashboard, go to Plugins> Installed Plugins, and select the drop down menu to Disable All Plugins and click Apply. If the HTTP error is fixed, reactivate all the plugins, and now deactivate the first one. Check to see if the image uploads and if it does, activate it again. Repeat the process with all the other plugins to find the culprit.

If deactivating the plugin doesn’t help, go to Appearance> Themes, and switch to the default WordPress theme. If the image uploads now, you should either change your theme or tell the theme developer about the issue.
5. Increase the Memory Limit
Your web-server needs some memory space for the background process to upload an image. This might not be a problem if you are using a VPS or a Dedicated Server Hosting, but you may lack space in case of Shared Hosting.
Generally, the memory provided by most of the shared hosting plans is 32 or 64 MB. You should increase it to 256 MB for optimal performance.
Here are some ways to do it:
a. Changing the PHP Memory Limit in wp-config.php
You first need to install an SFTP (Secure File Transfer Protocol) tool. One such free software is FileZilla https://filezilla-project.org/.
After installing Filezilla,you can follow the official guidelines https://wordpress.org/support/article/using-filezilla/ to set up the tool.
After setting up the tool, you will see a screen like this:

Your site’s files will be on the top right quadrant. Open the root folder of your website- it can be either public_html, your website name, or www. There, you will find a file called wp-config.php.

Inside the file, find the line that says:
define( ‘WP_MEMORY_LIMIT’, ’32M’ );
Or, there could be other numbers like 64 or 128. Change it to 256.
Be careful not to modify anything else in the file.
b. Editing the .htaccess file
The process for finding .htaccess is also similar to wp-config. Install a SFTP, and the file, if available, will be inside the root folder. Add the following code on the top of the file:
<IfModule mod_suphp.c>
suPHP_ConfigPath /home/yourusername/public_html
</IfModule>
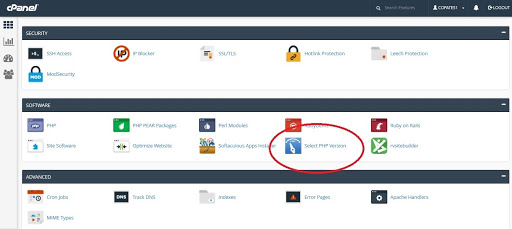
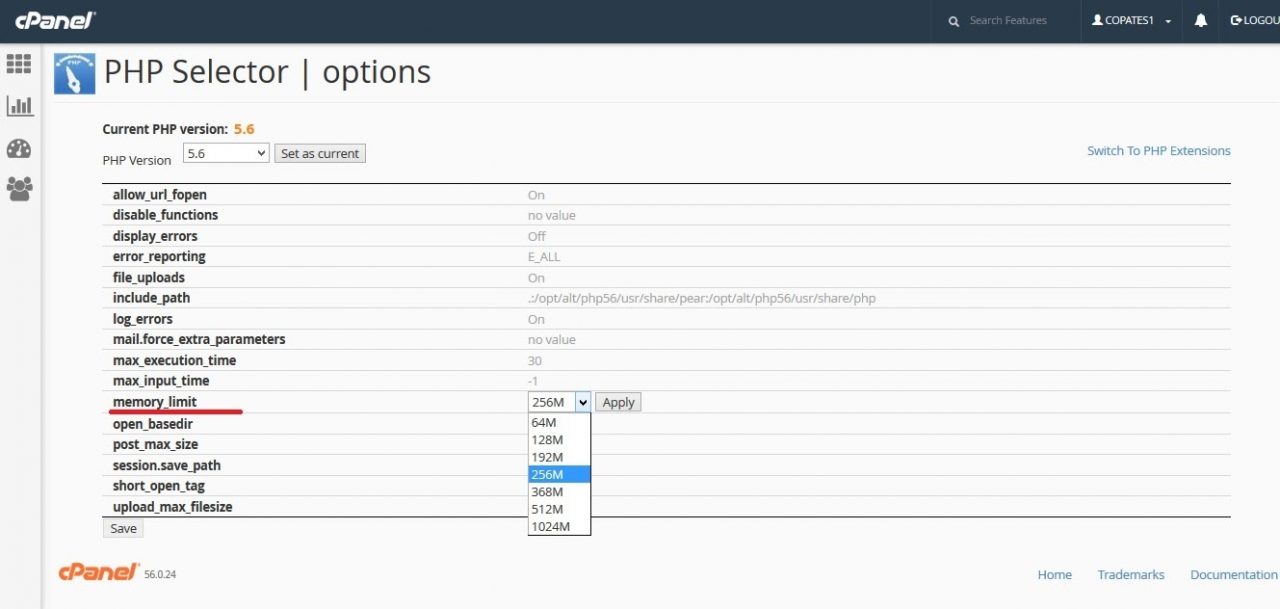
c. Changing PHP Memory Limit on cPanel
If you have cPanel, login to the tool and click on Select PHP Version> Switch to PHP Options under the Software section. Change the memory limit to 256 MB.
6. Change Your Image Editor
WordPress has two image editors, Imagick and GD Library. In simple words, WordPress uses these two software to upload and edit images on your website.
Imagick may sometimes cause WordPress media HTTP errors. So, you will need to change your default theme to GD Library.
To do that, go to Appearance>Theme Editor. Open functions.php, and add the following code on the top:
function wpb_image_editor_default_to_gd( $editors ) {
$gd_editor = ‘WP_Image_Editor_GD’;
$editors = array_diff( $editors, array( $gd_editor ) );
array_unshift( $editors, $gd_editor );
return $editors;
}
add_filter( ‘wp_image_editors’, ‘wpb_image_editor_default_to_gd’ );
Save the file and see if it fixed the error.

7. Upgrade Your PHP Version
The process for changing your PHP version depends on the tool that your hosting provides you.
If you use cPanel, you can find Select PHP Version under Software. There, you can view your current PHP version and upgrade it to the latest one.

8. Remove Custom Media Library Path
The HTTP image error may also occur when the media library path is not set to default. You should always store your media on this path:
/wp-content/uploads
Go to Settings>Media and make sure the Window looks exactly like this. Remove the path if it has been listed.

9. Disable Mod_security
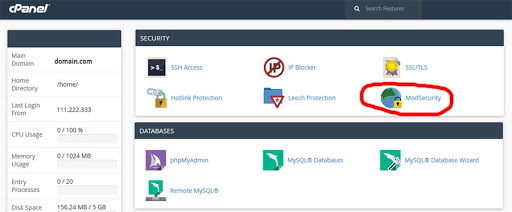
Mod Security is a firewall that can avoid WordPress from uploading image files. You can disable it in two ways:
If you use cPanel, select Mod Security under Security and toggle the switch to off.
You can also add the following code into your .htaccess file:
<IfModule mod_security.c>
SecFilterEngine Off
SecFilterScanPOST Off
Final Tip: Use the Add from Server Plugin
If you are in an emergency and desperately need to upload your images, you can use the Add from Server Plugin.
Add from Server was originally made to upload large files into WordPress via SFTP bypassing the errors and memory limitations. To install it, go to Plugins on your Dashboard and search for its name.

Remember that Add from Server plugin is just a temporary fix to the WordPress image upload HTTP error. The support and updates for the plugin have already been closed even if you can still use it.
Conclusion: The WordPress image upload HTTP error is annoying, but you can quickly fix it if you know the cause. The above steps should be enough for you to solve the problem, but if they somehow don’t, you should call your web hosting provider. You can also always contact us if you have any inquiries or feedback regarding the article.